
Rule based systems are one of the quintessential pillars of generative art, where sets of predefined rules coalesce into a multitude of different patterns and designs. Arguably, the most famous example for this is John Conway's Game of Life, a cellular automaton that gives rise to an infinite number of different patterns, emerging from a simple set of rules.
Building and playing with such a system is one of the most satisfying and fulfilling aspects of creative coding - an exploratory approach to coding is encouraged, and code tweaking is rewarded with new, exciting and unexpected results.
In this manner the question 'What if?' becomes the overarching narrative that drives the sketch forward. What if I add this constraint? What if I add another rule here? What if I add a random offset there? You'll only know what you'll get by adding in these rules and running the code.
The other day I came across such a rule based system, that immediately sparked a lot of exciting ideas. For a while now, I'd been searching for an algorithm, or a strategy, that could generate organic patterns without being overly complicated. And that's exactly what I stumbled across.
All credit here goes to Kevin Workman who came up with the idea for the 2021 Genuary prompt One process grows, another process prunes.
It's a simple concept, but the resulting patterns are really impressive. At it's core it's a type of circle packing procedure, with the added twist that circles are placed in a propagative manner, growing a tree-like structure outwards starting from an initial node.
You can find the original implementation on his website Happy Coding, where he's collected many more of his sketches and tutorials - I really recommend checking it out, as it's a treasure box of creative coding and p5js material:
 Happy Coding
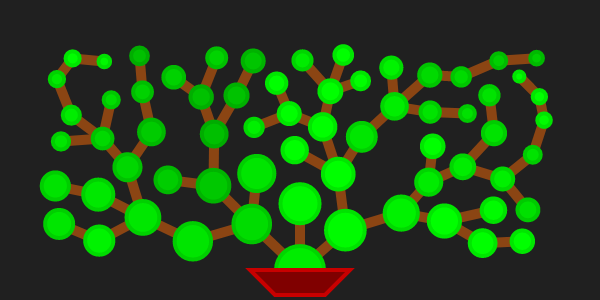
That said, let's first see what this sketch is about and then dive into the nitty-gritty of the implementation!
Here's what we're going to put together:
The Idea
The idea is pretty straightforward: starting from an initial node, we place a new node somewhere in it's vicinity, such that the original node becomes a parent node to the newly placed one. Now, both the original node, and the newly placed one have the ability to place further nodes in their vicinity. These nodes can then in turn place new nodes, and so on. Just like a tree that grows new branches, we grow a structure of connected nodes outwards populating the space on the canvas
The important thing here, is that nodes can only be placed in such a manner that they don't overlap or intersect other nodes that already exist on the canvas. Naturally, we also need to include a stopping criteria, to determine when this system should stop growing; either when the entire canvas has been filled, or when the individual branches have reached a certain maximum length.
And that's essentially the core idea that powers a large multitude of different patterns - depending on how we end up dialing in the parameters of this system:

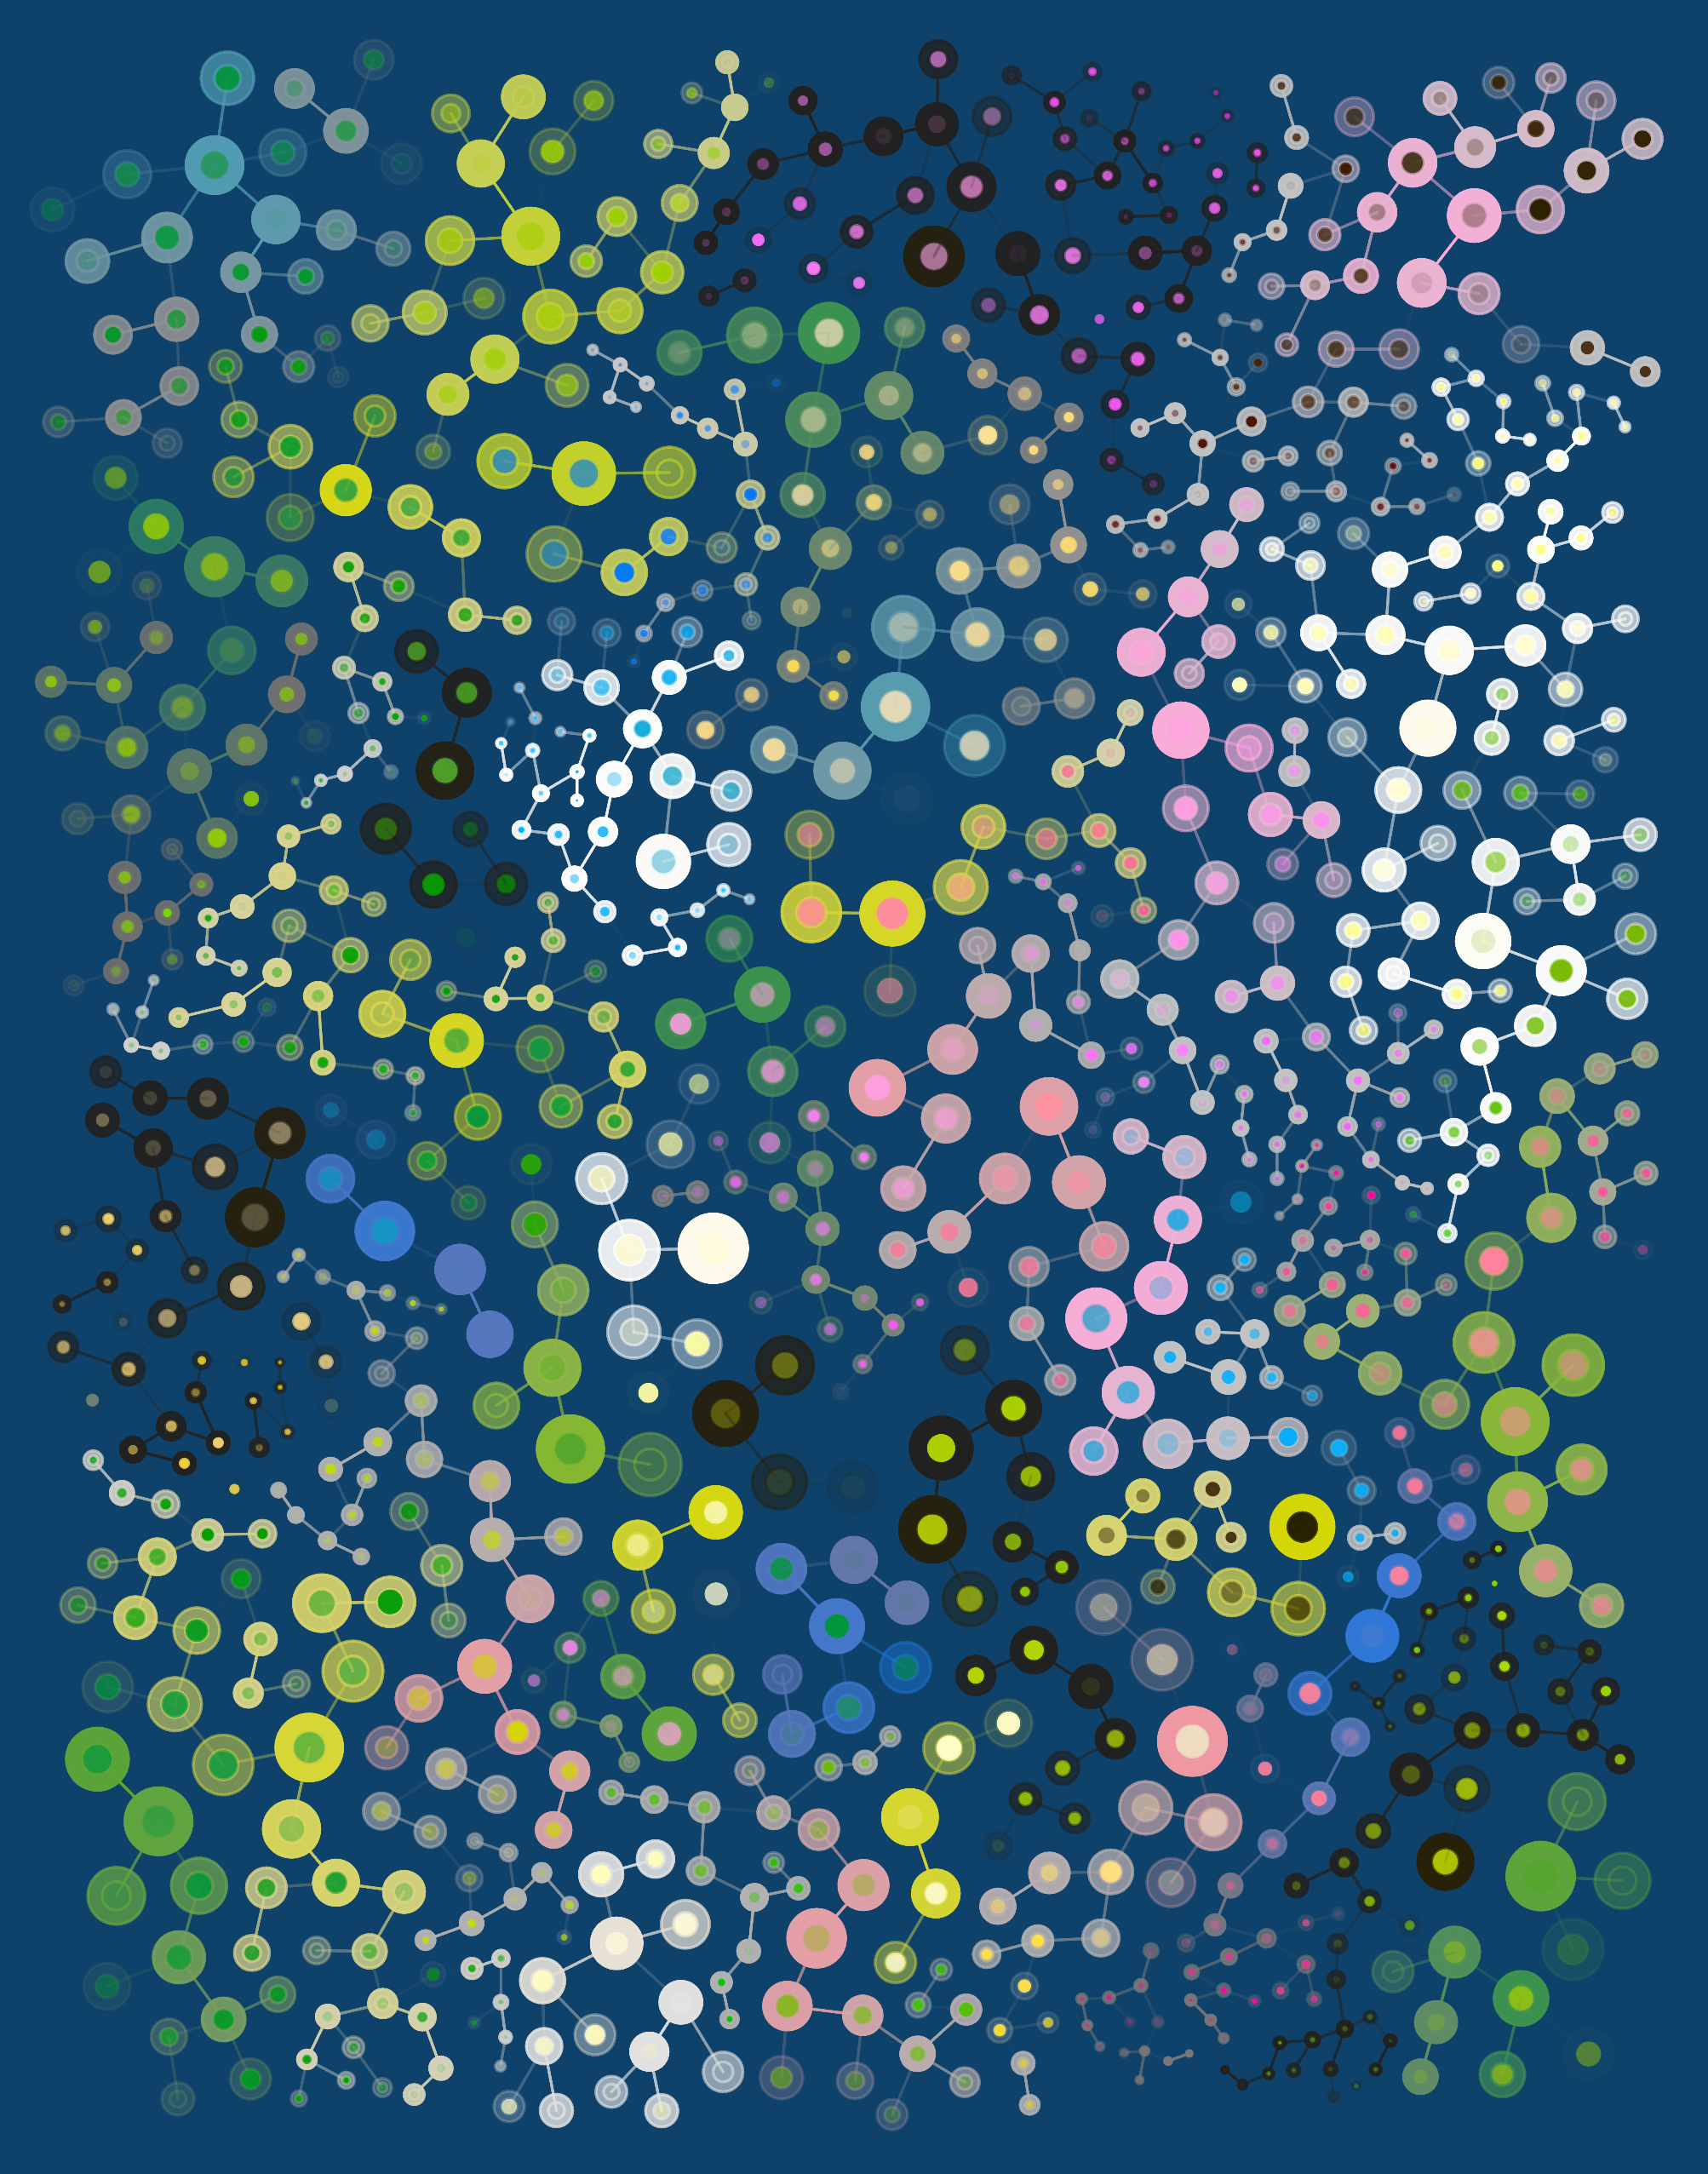
Some stylistic explorations
For instance, we could set conditions on the size of the circles, such that newly placed nodes need to be smaller than their parent nodes. This would result in a pattern where branches decrease in size as we move outwards. We could also play with the colors of the nodes, such that child nodes inherit a slightly darker shade of their parent node's color. There's a lot of room for experimentation!
Tree Data Structures
How do we approach this idea from an algorithmic point of view?
Well, the resulting patterns don't just resemble trees, but they can actually also be represented as trees. Let me explain what that means. Trees are very versatile data structures for a number of different applications:
In computer science, a tree is a widely used abstract data type that represents a hierarchical tree structure with a set of connected nodes. Each node in the tree can be connected to many children (depending on the type of tree), but must be connected to exactly one parent,[1] except for the root node, which has no parent (i.e., the root node as the top-most node in the tree hierarchy) - Wikipedia
This one takes me way back to my undergrad days, when I was still learning about different kinds of data structures - I remember struggling a lot with linked lists initially, when we were tasked with implementing one from scratch in Java.
Based on the above explanation, a tree data structure boils down to connecting a number of nodes in a parent-child relationship. In this manner, we don't actually have to explicitly define this tree, nor does it exist as a tangible entity in our code, but rather, it emerges through a bunch of connected nodes. This will hopefully become clearer in the coming sections.
The best way to approach this, is in an object oriented manner, in which we create an abstract Node class that can store a reference to it's parent node, as well as an array of references to it's child nodes. A tree is actually a special kind of graph structure, where nodes can only ever have one parent node. Otherwise it would be a completely different beast. Armed with this node class, we can then create as many instances as we want and wire them up in a tree like structure. That way we can store their individual positions and sizes, but more importantly give them useful functionality to draw them to the canvas and allow them to spawn their own child nodes.
A Recursive Placement Procedure
To grow our tree, we could simply store all nodes in a separate array, pick a node at random from that array, and then try to append a new child node to the selected one. If it's not possible to do so, we simply try another random node and so on. But this isn't that efficient, because once the tree grows larger, most of the nodes that lie somewhere towards the center, would already be surrounded by other nodes. Hence there wouldn't be much point in trying to attach new nodes to them, since there's no space anyway.
A better strategy for growing our tree, is the way that Kevin did it in his original implementation. Instead of trying to grow random nodes in the scene, we'll try to grow the root node (growing here means attaching another node), if this fails (due to lack of space), we pick one of it's already existing children (if it has any), and try to grow this child node instead. If that fails, we pick a child of that child node and repeat the procedure. In this manner, we're iteratively traveling down a branch of the tree. This can be done very elegantly in a recursive manner, such that we always end up traveling outwards towards the outermost child nodes. I believe that this way the tree grows in a much even manner.
This recursive procedure can be split into two distinct functions, one that creates a child node and attempts to place it, and another one that takes care of the traversal and calling the recursive step when the placement fails.
In the placement function we have to compute a number of things: an angle, a distance value and a size parameter, to determine where the node should be placed with respect to it's parent node. We also need to check for collisions between the to-be-placed node and already existing nodes. There are a couple of things that we also have to consider here. For instance, as the tree grows larger, the number of checks that we have to make will grow exponentially. This can get really slow at some point. For aesthetic reasons, we also don't want nodes to intersect the edges that connect already existing nodes on the canvas, which requires an additional separate check. We'll talk more about this in a bit.
The Algorithm
Alright, now we can get to work and implement this algorithm!
The Node Class
Let's begin with the Node class that constitutes the heart piece of our sketch.
class Node(parentNode, position, radius, depth){
  constructor(){
    this.parentNode = parentNode
    this.childrenNodes = []

    this.position = position // of the form {x: x, y: y}
    this.radius = radius

    this.depth = depth
    this.id = idCounter++
  }
}
Let's see what we have got here. Each node stores a reference to it's parent node, holds an array of children nodes - which will create later on - as well as information about it's position and size.
There's two additional parameters here, a depth variable that tracks how far down we are in the tree - we'll use it to check if we've reached a certain depth, in the case that we want to limit the maximum length of the branches. Furthermore, we also give the node an id via a global counter that gets incremented whenever a new node is created. This one we'll use during collision checks to conveniently avoid checking a node against itself.
Another function that we can also already cover here, is the function that draws the node to the canvas:
this.display = function(){
  if(this.parentNode != null){
    line(this.position.x, this.position.y,
          this.parentNode.position.x, this.parentNode.position.y)
  }
  ellipse(this.position.x, this.position.y, this.radius)
}
It's simply an ellipse, in addition to a line that goes from the center of the current node to the center of it's parent node. Naturally for the root node this isn't possible as it doesn't have a parent node, hence we need to check for that with an if statement.
The Recursive Procedure
Now to the meat of the sketch. As mentioned earlier, we'll implement the recursive step in two parts: a function that can create new nodes and tries to place them, and another one that repeats the placement process for an already existing child node if the prior function fails.
Let's start with the latter:
this.grow = function(){
  let canGrow = this.attemptGrowth()
  if(!canGrow){
    let randChild = random(this.childrenNodes)

    if(randChild){
      randChild.grow()
    }
  }
}
Basically, we have another function called attemptGrowth() - we'll have a look at it in just a second - which returns a boolean value, indicating if a child node has been appended or not. If the result is truth-y, then we simply terminate.
If the contrary is true however, then we select an already existing child node from the array of child nodes of the current node (if there are any) and call revursively repeat this procedure for the selected node.
The code of the placement function attemptGrowth() looks as follows:
  this.attemptGrowth = function(){
    if(this.depth>0){
      let angleFromParent = random(TAU)
      let distFromParent = random(minBranchLength, maxBranchLength)
      let childSize = constrain(this.radius*random(.8,.95), 2, 70)

      let childPosition = {
        x: this.position.x + distFromParent * cos(angleFromParent),
        y: this.position.y + distFromParent * sin(angleFromParent)
      }

      let child = new makeNode(this, childPosition, childSize, this.depth-1)

      // check for intersections here
      let placeable = true
      for(let n = 0; n < allNodes.length; n++){
        if(
          child.intersects(allNodes[n]) || this.boundaryCheck()
          ){
          placeable = false
          return false
        }
      }

      // attach the new node
      // and append to
      if(placeable){
        allNodes.push(child)
        this.childrenNodes.push(child)
        return true
      }
    }
  }
There's a few things here that we need to address. Firstly we want to compute some values that indicate how the node, that is-to-be-placed, should be placed. We do this by calculating an angle and a distance value, convert from polar coordinates to Cartesian coordinates, and then store them. After selecting a radius for the child node, we can create a new node object with these parameters.
In the implementation by Kevin, the procedure for checking for intersections is also done in a recursive manner. But here I'm cheating a little bit and using a loop. Whenever we attach a new node, we'll actually also store a reference to it in a separate array, such that we can conveniently loop over this array and check for collisions. This comes at the cost of using more memory, but has the advantage that it allows the existence of multiple root nodes, if we want to have multiple trees in the scene that we don't want to overlap. We can still do it in a recursive manner later, by storing references to the root nodes.
To check for collisions between nodes we simply check if the distance between their centers is less than the sum of their radii. Circle collisions are the easiest type of collision to compute.
Overall, this strategy is quite flexible, later on we can try to do it a bit differently, for instance, we could try to attach new child nodes at the extremities first and then travel backwards instead of attaching nodes at the first possible occasion close to the center.
A preliminary example
Let's take what we've got so far and put it all together:
In p5's setup function we're creating a single node which we'll use as the initial root/source node. We'll set it's parent to null, since it's not attached to any other node yet.
In the draw function we now simply need to invoke the grow() function of the source node, and the magic procedure that we describe earlier will start placing nodes, growing our first tree like structure.
Node / Edge Collision
There's a couple of things in the above sketch that I think we can improve on; for instance I don't like that circles can overlap the edges that exist between some of the nodes.
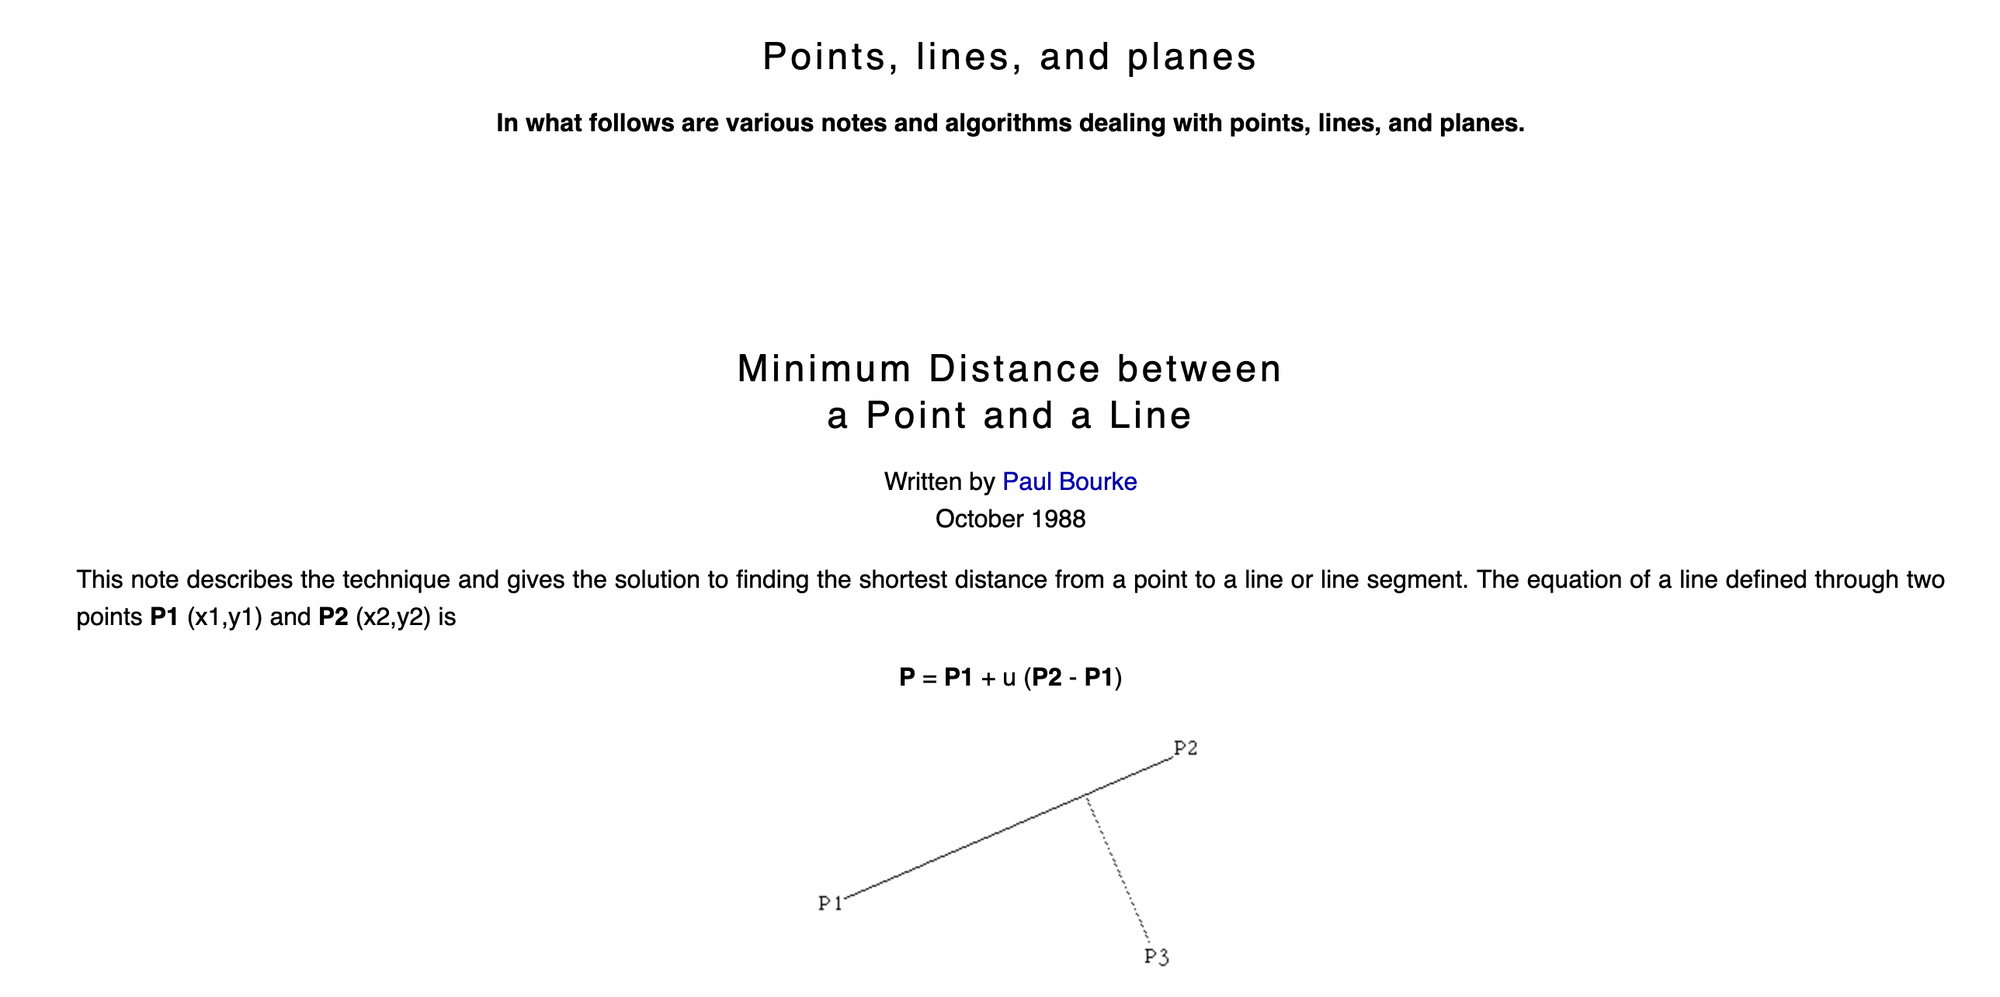
For this we'd have to compute collisions between circles and line segments. However, since we don't have to actually determine the points of intersection between the node circles and the edge segments, we can simplify this and compute the point distance of the center of the node to the edge segment, which I believe is computationally slightly simpler and less taxing. I'm not going to go cover the math here and just show you how it's done.
We recur to this trusty old resource by the legend Paul Bourke, who's probably documented every type of intersection in existence:
An implementation for it can be found in this stackoverflow answer:
function dist2(v, w) { return sq(v.x - w.x) + sq(v.y - w.y) }
function distToSegmentSquared(node, edge) {
  p = node.position
  v = edge.p1
  w = edge.p2

  var l2 = dist2(v, w);
  if (l2 == 0) return dist2(p, v);
  var t = ((p.x - v.x) * (w.x - v.x) + (p.y - v.y) * (w.y - v.y)) / l2;
  t = Math.max(0, Math.min(1, t));
  return dist2(p, { x: v.x + t * (w.x - v.x), y: v.y + t * (w.y - v.y) });
}
function nodeEdgeCollision(p, v, w) { return sqrt(distToSegmentSquared(p, v, w))}
And integrate into our sketch we'd get:
Basically, whenever we create a new child node, we also create an edge object represented by it's starting and end point (the center of the current node and it's parent) of the form `{ p1: {x: x, y: y}, p2: {x: x, y: y} }` and store it in a separate global array called edges. While trying to attach a new node to the tree, we can loop over this array and check if this new node intersects any of the existing edges - just like we check for intersections with other nodes.
Edge / Edge Intersection
Now if you run this sketch a couple of times, you'll notice that there's still another issue. It's a bit subjective, but I also don't particularly like it when edges cross each other. To avoid this we'd need an additional line segment intersection test, a function that accomplishes this can be found in this stackoverflow answer:
// returns true if the line from (a,b)->(c,d) intersects with (p,q)->(r,s)
function edgeIntersect(edge1, edge2) {
  let [a,b] = [edge1.p1.x, edge1.p1.y]
  let [c,d] = [edge1.p2.x, edge1.p2.y]
  let [p,q] = [edge2.p1.x, edge2.p1.y]
  let [r,s] = [edge2.p2.x, edge2.p2.y]

  var det, gamma, lambda;
  det = (c - a) * (s - q) - (r - p) * (d - b);
  if (det === 0) {
    return false;
  } else {
    lambda = ((s - q) * (r - a) + (p - r) * (s - b)) / det;
    gamma = ((b - d) * (r - a) + (c - a) * (s - b)) / det;
    return (0 < lambda && lambda < 1) && (0 < gamma && gamma < 1);
  }
};
And in action:
Now we have much more control over the resulting pattern. When it comes to performance, this isn't quite that efficient, since we need to go over all other nodes and edges whenever we place a new node. A solution for reducing the number of necessary checks by implementing a grid lookup, I've covered how this works in this article:
If you want to challenge yourself and implement it with this sketch, go for it!
I'll cover this in a second post, as this one is already getting quite lengthy.
Concluding Thoughts
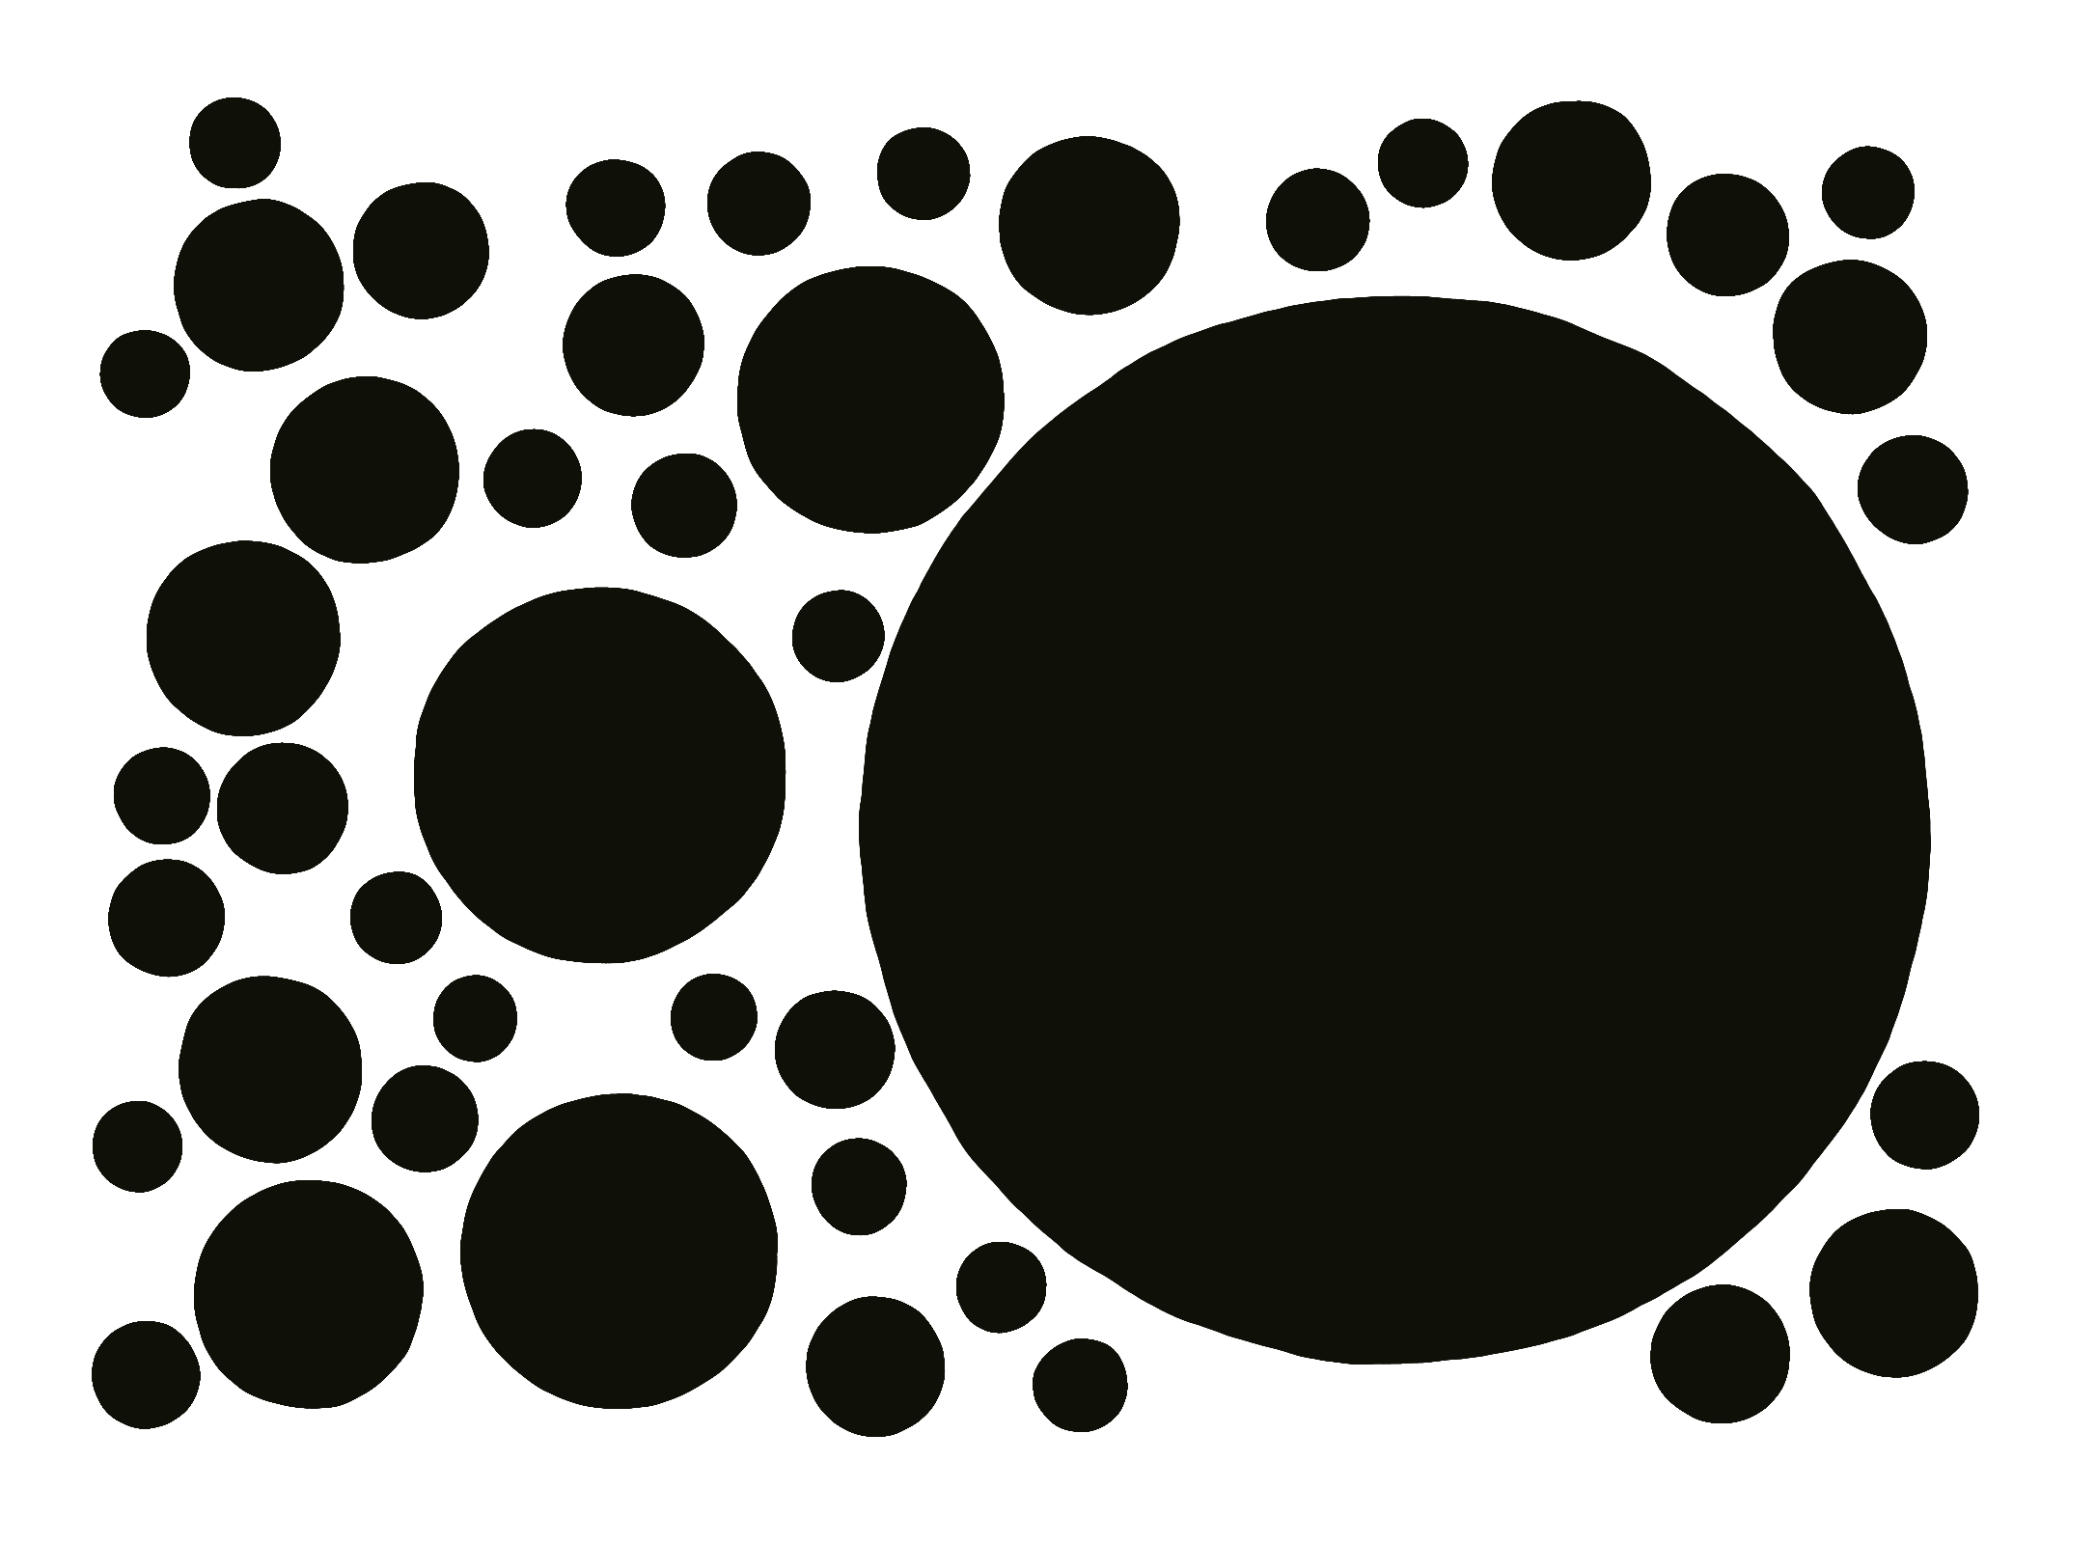
For the final code I added in a loop in the setup function to place a number of initial nodes such that they don't overlap:
So overall, besides being a really cool algorithm I also noticed that it's a much faster strategy for circle packing. You don't necessarily have to draw the connections between the circles, nor do you have to make the circles shrink the further you travel from the root node - and I think you'd get something that is visually very close to a regular circle packing algorithm. I think that way it's also a bit faster, because instead of trying random positions on the canvas - which are slowly populated by circles - we're actually trying to place circles in places where there potentially is free space. Starting the recursive procedure from the child nodes - backwards - towards the root could also potentially be an interesting exploration.
There's more things in Kevin's code that I didn't cover here, for instance, there's the ability to prune a branch, which I find visually really cool. I'll cover that in the next post hopefully. That said, this one's a wrap. Big shout-out to Kevin and his lovely website! Cheers, happy sketching, and if you enjoyed this post consider sharing it on your socials ~ Gorilla Sun 🌸