
This post is a direct continuation of the previous article Spring Physics, Particles and Meshes. If you haven't read that one yet, then I recommend checking that one out first before coming back here.
All about spring physics and combining them with particles to create bouncy meshes. Links to all previous posts in the series can be found here as well.
In this post we'll talk in more detail about soft body physics, explore some of the different shapes that can be constructed with particles and springs, and discuss some approaches to creating different kinds of squishy blobs.
We concluded the last post by creating a spring mesh - a structure that consists of a number of particle instances connected by springs in a very particular manner. But that's just the tip of the iceberg, a rectangular mesh is only one of the possible shapes that we can create with the system that we've built so far. There's many more interesting structures that can be constructed by chaining together particles with springs in particular manners, each of them presenting a different behavior depending on it's particular skeletal structure.
One very popular shape in creative coding and generative art are blobs, and it's actually a really tricky problem to configure them to your liking. We'll get into more detail on this later on. The direct inspirations for this article are two wonderful blobby sketches from two awesome creative coders - Roni Kaufman:
Experimenting with blobs pic.twitter.com/AdvA3jSCCb
— Roni Kaufman (@KaufmanRoni) June 21, 2022
And Juhani Halkomaki:
#creativecoding #p5js
— Juhani Halkomäki (@JuhaniHalkomaki) February 27, 2023
Inflate/deflate/gm pic.twitter.com/WBUpwgQqrh
Juhani's sketch even inspired Daniel Schiffman to make a video on the topic:
Dan uses the famous toxiclibs library by Karsten Schmidt to create the cute and bouncy character that you see in the thumbnail. If you don't feel like coding all of the parts of the code from scratch like we're doing, and want a solid library to handle the involved physics for you, then toxiclibs is probably the way to go. Dan also talks a little bit about the historic significance of toxiclibs in creative coding.
In this post however, we'll be creating some very bouncy and deformable blob shapes by making use of the physics system that we've built over the course of the past 4 articles. Here's what we'll be making:
Let's get into it 👇
Improvements
Before we dive straight into coding our soft body blobs, I'd like to first make a number of improvements to the particle system that we've put together so far! We'll make some modifications to the boundary collisions as well as the mouse drag functionality that make them more accurate, and we'll also add our grid lookup back in!
Improved Boundary Collisions
On my last Twitter post in which I announced the previous article, I got a comment by Galo - another awesome creative coder and generative artist - with an idea for improving the function that prohibits particles from leaving the canvas, indicating that there's a better way to handle boundary collisions:
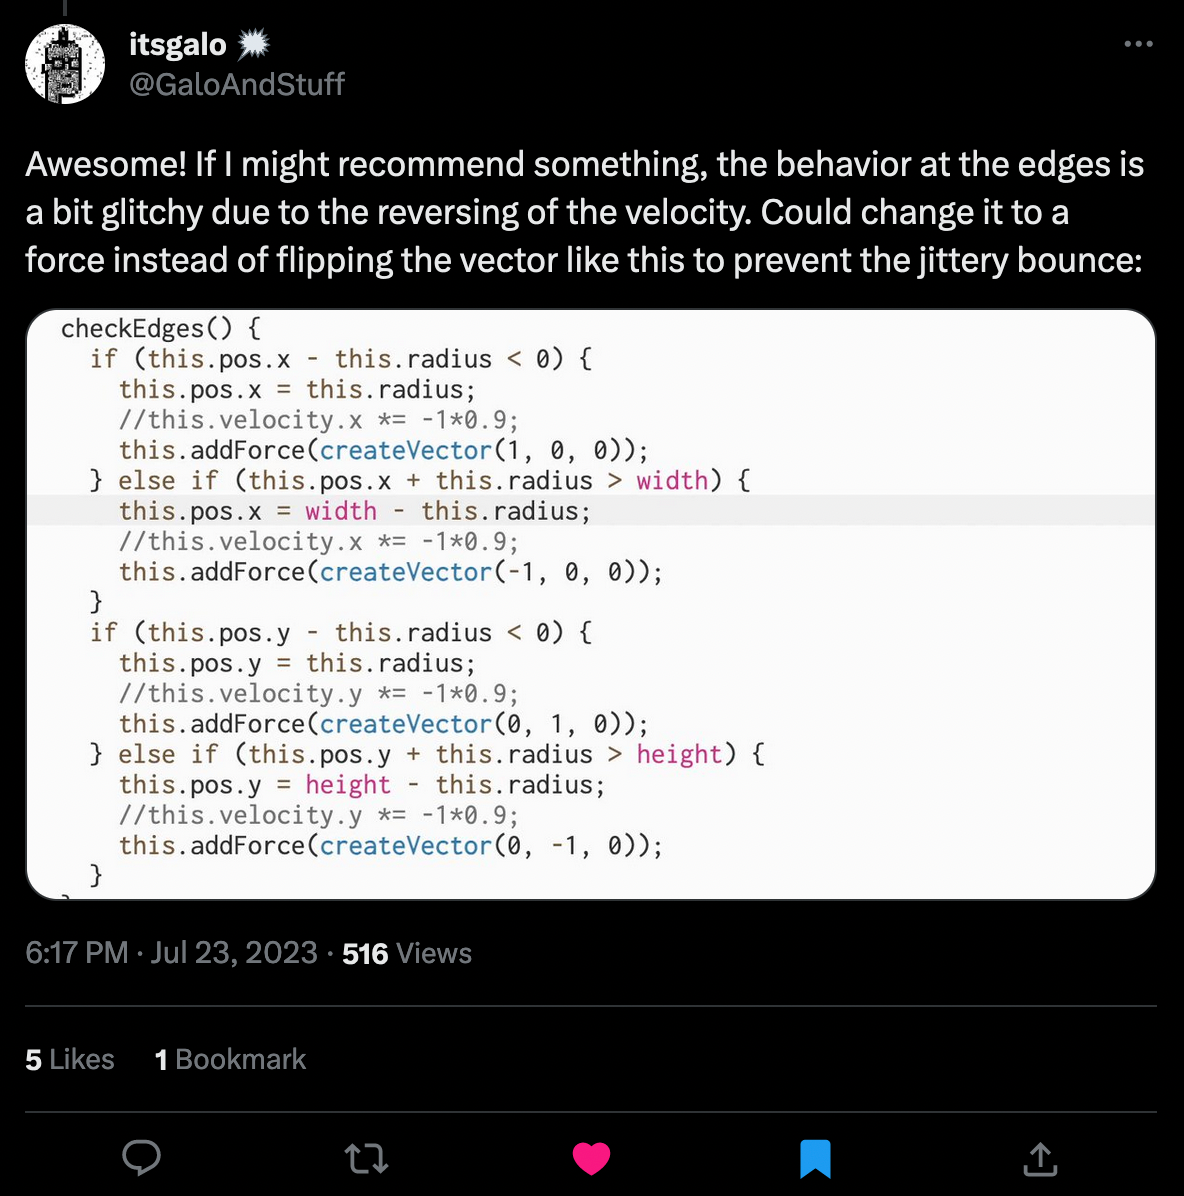
The way that we've done it so far: when it's registered that a particle's radius exceeds one of the boundaries of the canvas, we simply invert the velocity of the respective horizontal or vertical component, depending on which boundary has been crossed. This comes with the side-effect that the particle sometimes gets stuck on the edges in a jittery and glitchy manner.
A better way to do this, is by applying an opposing force to the particle when it hits the boundary, giving it a soft and smooth push in the opposite direction that it's coming from. Since we already added such a function to our particle class that accepts as input a force vector and adds it to the velocity of our particle, we'd only need to alter our checkEdges() function slightly and pass in a vector pointing pointing inwards towards the canvas.
Here's what this new behavior looks like in action with some random particles dispersed on the canvas:
Btw, Galo is also a certified blob scientist:
Improved Mouse Drag
We can also make some improvements to the code that takes care of dragging and dropping the particles. The previous behavior was a bit wonky, where it would only move the particle along with the mouse while the mouse was being dragged. If we pressed a particle, without moving the mouse, the particle would simply jump back towards the position that the attached springs drag it to. We don't want that, instead, even if we are not moving the mouse we'd like the particle to stay at the position of the cursor.
Let's get rid of the previous code and make some modifications to the Particle class, adding the dragging behavior to the particle class itself - for this we need to add a new member variable:
this.dragging = falseSimply a boolean flag that indicates that the particle is being dragged. Now, we need to give the particle two new functions that take care of toggling this flag when the mouse is pressed and the cursor is within the radius of the particle:
mousePressed() {
  if (dist(mouseX, mouseY, this.pos.x, this.pos.y) < this.radius) {
    this.dragging = true;
  }
}

mouseReleased() {
  this.dragging = false;
}
In the particle's mousePressed() function we check if the cursor is inside of the particle's radius, if that is the case we can set it's dragging flag to true. As for the mouseReleased() function, we reset the dragging flag to false again.
In the particle's update function we take care of what happens when the particle's dragging flag is set to true. We run a different behavior if that is the case:
updateState(newPos) {
  if(!this.dragging){
    this.addForce(this.acceleration);
    this.limitVelocities()
    this.pos.add(this.velocity);
  }else{
    this.velocity = p5.Vector.sub(createVector(mouseX, mouseY), this.pos);
    this.pos.add(this.velocity);
  }
}
In the case that it is being dragged, we register the offset between the mouse coordinates and the current position of the particle - this then actually becomes the new velocity of the particle. This is important because once we release the particle we kind of want it to retain some amount of velocity and keep traveling into the direction that we were dragging it, and not simply lose all momentum and sit wherever we released the mouse. Then we also need to set the position of the particle to this velocity such that the particle follows the cursor.
Lastly, we use P5's inbuilt mousePressed() and mouseReleased() functions to loop over all particles and trigger the particle's mouse functions:
function mousePressed() {
  for (let i = 0; i < particles.length; i++) {
    particles[i].mousePressed();
  }
}

function mouseReleased() {
  for (let i = 0; i < particles.length; i++) {
    particles[i].mouseReleased();
  }
}
And in action this works as follows:
You might have noticed, I also made an additional change to the checkEdges() function, such as not to kill the entire momentum of a particle when it collides with the boundaries:
checkEdges() {
  if (this.pos.x - this.radius < 0) {
    this.pos.x = this.radius;
    this.velocity.x *= -.25;
    this.addForce(createVector(1, 0))
  } else if (this.pos.x + this.radius > width) {
    this.pos.x = width - this.radius;
    this.velocity.x *= -.25;
    this.addForce(createVector(-1, 0))
  }

  if (this.pos.y - this.radius < 0) {
    this.pos.y = this.radius;
    this.velocity.y *= -.25;
    this.addForce(createVector(0, 1))
  } else if (this.pos.y + this.radius > height) {
    this.pos.y = height - this.radius;
    this.velocity.y *= -.25;
    this.addForce(createVector(0, -1))
  }
}
There probably is still a better way to do this. Here I'm essentially combining both behaviors from earlier.
Adding the Grid-lookup back In
And to make things run faster, we'll also add our grid look-up back in. This is important because the soft body blobs will end up being made up out of a large number of particles. We'll just use the very basic form of the grid lookup, without all of the other mini optimizations that we discussed in the spatial hashing article:
For your convenience, here's the entire grid class:
class Grid {
  constructor(canv_wid, canv_hei, s) {

    this.cellSize = s;

    this.numCols = Math.ceil(canv_wid / s);
    this.numRows = Math.ceil(canv_hei / s);

    this.cells = [];

    for (let x = 0; x < this.numCols; x++) {
      this.cells[x] = [];
      for (let y = 0; y < this.numRows; y++) {
        this.cells[x][y] = [];
      }
    }
  }

  addParticle(particle){
    let col_idx = Math.floor( particle.pos.x / this.cellSize);
    let row_idx = Math.floor( particle.pos.y / this.cellSize);

    this.cells[col_idx][row_idx].push(particle)
    particle.gridCell = { col: col_idx, row: row_idx }
  }

  removeParticle(particle) {
    let { col: col_idx, row: row_idx } = particle.gridCell
    let cell = this.cells[col_idx][row_idx];
    let arr_idx = cell.indexOf(particle);
    cell.splice(arr_idx, 1);
  }

  getNeighbors(particle) {
    let top_left = [
      floor((particle.pos.x - particle.radius) / this.cellSize),
      floor((particle.pos.y - particle.radius) / this.cellSize),
    ]

    let bottom_right = [
      floor((particle.pos.x + particle.radius) / this.cellSize),
      floor((particle.pos.y + particle.radius) / this.cellSize),
    ]

    let neighbors = []
    for (let i = top_left[0]; i <= bottom_right[0]; i++) {
      for (let j = top_left[1]; j <= bottom_right[1]; j++) {
        if (i < 0 || j < 0 || i >= this.numCols || j >= this.numRows) continue
        let c = this.cells[i][j]
        for(let p of c){
          // don't add the particle itself
          if(p != particle) neighbors.push(p)
        }
      }
    }

    return neighbors
  }
}
Simply drop it into your code and make sure to add the particles to the grid when you create them:
grid.addParticle(particle);In the draw loop, while checking for collisions between particles, we then just fetch the neighbors of a particular particle from the grid and pass those as input into the checkCollision() function:
let neighbors = grid.getNeighbors(p)
p.checkCollision(neighbors)
Make sure to loop over this array in the checkCollisions() function, instead of the global particle array. Lastly we just need to update the grid at the end of every draw loop by removing all particles and adding them back again:
for (let p of particles) {
  grid.removeParticle(p)
  grid.addParticle(p)
}
And a complete example goes here:
The code here needed to be minified to be able to run in the widget. Feel free to copy it over to your editor of choice and auto-formatting it for readability purposes.
Soft Body Physics
Alright, I think that's enough foreplay for now. Let's get to the main topic: Soft Body Physics!
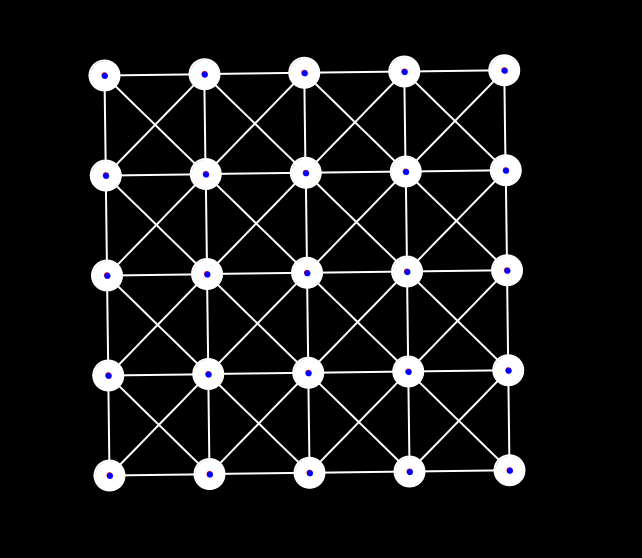
In the most recent post we actually already had a stab at soft body physics when we created a mesh out of particles and springs! In physics a soft body is some type of material that can undergo significant deformations but still retain it's overall structure, just like the mesh that we made:
Here's the mesh sketch again, but with all of the improvements that we've covered in the previous sections.
There's multiple approaches to creating soft bodies in physics simulations, in our case we're using a mass-spring system; as the name suggest, it makes use of a wireframe of connected particles and springs to model the overall shape of the body.
In this way we already have seen a good method for creating rectangular and block-y shapes, simply by arranging the particles in a grid like manner and then connecting each particle with all of it's neighbors using springs. Naturally, the diagonal springs here need to be a bit longer.
So, the question now is, how do we arrange the particles and springs to create more organic shapes? Like a deformable blob for instance, that almost behaves like some sort of jelly? There isn't really a straightforward answer to this, because it depends on what kind of material you want to simulate, and how you want your blobs to ultimately behave. In the coming sections we'll first create a class for our blob and then experiment a bit with different configurations.
The Blob Class
It only makes sense to also model our blob as an object. It's two main member variables are arrays that store references to it's constituent particles and springs. Let's start with the constructor:
class Blob{
  constructor(){
    this.particles = []
    this.springs = []
  }
}
We'll leave the particles and springs array empty for now and set up a separate function makeParticlesAndSprings(), devised specifically for the purpose of populating these later on. We also need two more functions for our blob shape - one to handle the physics, compute collisions and apply the spring forces to the particles:
run(){
  for(let s of this.springs){
    s.update()
  }

  for(let p of this.particles){
    let neighbors = grid.getNeighbors(p)
    p.checkCollision(neighbors)
    p.checkEdges();
    p.updateState();
    p.limitVelocities()
  }
}
And another one to draw the particles and springs to the canvas:
display(){
  for(let p of this.particles){
    p.display()
  }

  for(let s of this.springs){
    s.display()
  }
}
And that's already a big chunk of our blob's functionality. Now we simply need to think about configuring the springs and particles in a meaningful manner.
Blob Configurations
If you've checked out Roni's tweet where he showcases his blob sketch, and went one tweet deeper, you'll have seen a sneak peek behind the scenes where Roni shows what's going on behind the scenes:
Debug view version of the same video: it's all particles and springs pic.twitter.com/KCXKNvRhLb
— Roni Kaufman (@KaufmanRoni) June 21, 2022
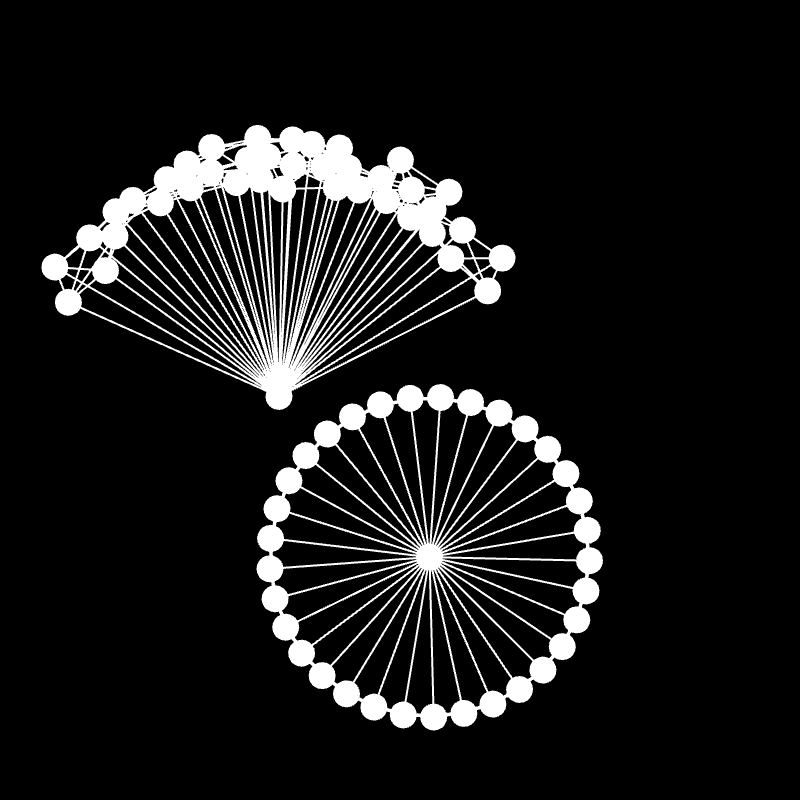
Let's observe what's going on here. The blobs in this case are essentially circles, spanning a number of particles around their circumference, connecting each particle with it's previous and next neighbor, as well as the particles one step further. There's also a central particle that is connected to all the other particles on the circumference, seemingly holding everything together.
Alright, that's a starting point! Let's try to recreate this - to do so let's add a couple more variables to our blob class:
constructor(startPos, radius, detail){
  this.startPos = startPos
  this.radius = radius
  this.detail = TAU/detail

  this.particles = []
  this.springs = []
}
A start position around which we'll center our particles, a radius that determines the size of this circle, and a detail variable, which is simply an integer that specifies the number of particles that we want to place evenly spaced out around on this circle. All three of these are passed in as inputs to the Blob's constructor.
Now we'll add the other function that we already mentioned earlier - makeParticlesAndSprings() that takes care of placing the particles on the circle:
makeParticlesAndSprings(){
  for(let a = 0; a < TAU; a+=this.detail){
    let x = this.startPos.x + this.radius * cos(a)
    let y = this.startPos.y + this.radius * sin(a)

    let p = new Particle( new createVector(x,y) )
    this.particles.push(p)
    grid.addParticle(p)
  }

  for(let n = 0; n < this.particles.length; n++){
    let p1 = this.particles[n]
    let p2 = this.particles[(n+1)%this.particles.length]
    this.springs.push(
      new Spring(p1, p2, dist(p1.pos.x, p1.pos.y, p2.pos.x, p2.pos.y), .25)
    )
  }

  particles.push(...this.particles)
}
Nothing too crazy here, we just compute the coordinates of the particles the standard trigonometric way, converting from polar coordinates to their Cartesian counterparts, which we use to create the particle and add it to the Blob's designated array, as well as the lookup grid.
Then in another loop we go over the particles one by one and connect them to their immediate consecutive neighbor with a spring. The rest length of these springs is the distance between the particles' positions on the initial circle. The stiffness parameter can be anything really, here I chose a moderate value of .25. We add these springs to the blob's springs array. And finally we also store references to the blob's particles in the global particle array that we use to check for mouse interactions.
Not having added a central particle yet, let's see what this looks like by creating two blobs and drawing them to the canvas:
Ah well... pretty poopy. We get two particle chains that promptly collapse into themselves, since there aren't any constraints that push the particles to try and maintain the structure of the initial shape. Let's add the central particle and the springs that connect it to all other particles, as well as another spring connection to neighbors one step further away, just like in Roni's sketch:
let centerParticle = new Particle(new createVector(this.startPos.x, this.startPos.y))

this.particles.push(centerParticle)
grid.addParticle(centerParticle)

for(let p  of this.particles){
  this.springs.push(
    new Spring(p, centerParticle, this.radius, .2)
  )
}
And in action this looks as follows:
And that's much better already!
Different Configurations
One thing that I didn't like about this blob configuration is that it can fold into what looks like a taco, when the central particle is dragged around too quickly:
I don't really like that, and overall these blobs are also not as squishy as I would like them to be, they stay relatively round at any given moment. What if we drop this central particle again, and do it a bit differently - for instance, what if we hide another smaller circle of particles inside of the outer one?
That's actually pretty nice, the blobs are much more deformable in this scenario, and kind of try to return to their original shape when they don't collide with anything else. We can also add more springs in between the two particle rings in an attempt to make them less jiggly:
That's also not bad. Can we get a similar behaviour without an inner ring of particles? And instead add more springs to the original outer ring making it more rigid?
Here we're simply adding springs with increasingly distant neighbors to each particle, but with decreasing stiffness, dividing the stiffness factor with the loop variable. This has the effect that the skin of the blob doesn't fold that drastically anymore at any given point. Now what if we combine both ideas in one:
I'm not entirely certain if this is better than the other ideas individually, but better here is quite a subjective term since it all depends on what you want to do with these blobs. I'll leave it here, maybe you can come with some cool cofingurations or even completely different approaches to modeling these blobs such that they have new and interesting behaviors. Let me know!
Closing Thoughts
In this post we had a look at soft body blobs, and how to go about making them. Even though it's not an incredibly difficult task from a programming point of view, there's a lot of room for improvement and fine-tuning the particle-spring systems to get interesting behaviors.
Furthermore there might more constraints that we can add to our blob shapes to make them behave in a more natural manner, for instance we could enforce them to maintain a consistent volume - however at this point I have no idea how I would go about doing that. Although I'm already exchanging ideas with some folks on the topic! 👀 If there's any particular direction you'd like me to take this in the next installment, let me know in the comments or shoot me a DM over on my socials!
That's it from me, let me know what you thought about this article in the comments 👇 otherwise consider sharing the post with friends and family on your socials, as well as signing up to the newsletter to receive updates whenever there's new content. Cheers, happy coding ~ Gorilla Sun 🌸